It was a public holiday down here on Monday (“Queen’s Birthday”) and after a very nice walk across some open countryside near the Southern Alps with my family, we stopped into visit a family from church. They run a 340 acre dairy farm, and while the children played with Lego, Leon showed me the current state of his office and filing system. His desk was strewn with paper, and although he had a new filing sytem, it wasn’t working out as well as it could. We talked about it for a few minutes, and then on remembering Eric’s recent post about going paperless, I asked Leon if he’d be interested in a way of getting rid of the paper and having everything stored digitally. And so began a new journey of learning …
Funnily enough, I’ve pretty much ignored the conversion of paper to digital images in my work until now (and equally too in the work of my clients; although scanned images fit perfectly into Pillar 1 – Shared Access to Team Data in my 7 Pillars model, I have only ever thought consciously about digital-original files, not converted ones). I have an extensive paper filing system, and haven’t ever thought seriously about going papernone (“no” paper) or even paperless (“less” paper). But after my explorations of the past couple of days–and in particular an introduction to PaperPort 11–I’m thinking seriously about doing so. As for Leon, he’s already signed off on PaperPort 11 and an HP ScanJet 7800 … and now we’re waiting for that to arrive.
Here’s what I’ve learnt to date, and what I’m thinking of doing.
Essential #1 … Scanning Documents Quickly
When looking at going papernone/paperless, a fast scanner is essential. There needs to be as little as human friction as possible in taking a new paper document and converting it into digital form. I’ve read about a number of different scanners in the past few days, and the main points of differentiation I’ve noted are:
- Flat Bed vs. Sheet Feed … A flat bed scanner has a lid like a photocopier so that bound books or magazines can be scanned page-by-page in addition to individual sheets of paper. A sheet feed scanner only does individual sheets of paper. Flat bed scanners often have a sheet feed capability too, so that the user doesn’t have to put each individual page on one-by-one. It’s pretty easy to make a decision on this one: if you only ever deal with unbound or unboundable paper documents, then a sheet feed scanner will be fine. If you sometimes or often need to scan one or two pages from a book or magazine, then flat bed is the way to go. And BTW, if you do purchase a sheet feed and then have to scan something from a book, merely use a photocopier first.
- Duplex or Simplex … Some scanners will scan both sides of the page in a single pass through, whereas others will only do one side at a time. For the relatively small incremental amount of money involved, I’d say go duplex. It will enable you to take a magazine and scan the whole thing, or to scan a utilities bill in a single pass.
- Resolution … The quality of the digital reproduction is predicated on the number of dots-per-inch (DPI) supported by a scanner, but even then, it depends on what you are scanning. If you are only doing letters, invoices and other text-oriented documents, then in my view, anything at 600×600 or better will be fine. There are some scanners that offer 2400×2400 or higher, and those are oriented towards people doing high quality color images … if that’s a need for you, go for it, but if it’s just documents, it’s overkill.
- Paper Size … Most scanners support the standard US letter or A4 paper size, but there are some that deal with larger sizes, eg, A3 — which is twice an A4. The decision here entire depends on what you will be scanning.
So for me … what are my requirements? I would want to scan all the letters that arrive, all of the project documents that I mark up on paper and currently file in paper project files, all of my invoices and receipts, and maybe even all of the paper magazines to which I subscribe. So I’d go for sheet feed, duplex, 1200×1200 or less resolution, and A4 paper size based on the list above. According to that list (but including a flat-bed here and there) … here’s some scanners of interest:
- From HP … the HP ScanJet 7800 (US$799, sheet feed, 25 pages per minute, 50 sheets at a time through an automatic document feeder), the HP ScanJet N6010 (US$500, sheet feed, 18 pages per minute, 50 sheets at a time through an automatic document feeder), and the HP ScanJet 8350 (US$1199, flat-bed, 25 pages per minute, 100 sheets at a time through an automatic document feeder).
- From Fujitsu … the Fujitsu ScanSnap S500 (US$495, sheet feed, 18 pages per minute, 50 sheets at a time through an automatic document feeder), the fi-5120C (US$???, sheet feed, 25 pages per minute, 50 sheets at a time through an automatic document feeder), and the fi-5530C (US$???, sheet feed, 35 pages per minute, 100 sheet automatic document feeder).
- Xerox has a line of DocuMate scanners too, but I haven’t explored those yet.
Any others I should look at?
Essential #2 … Managing Scanned Documents
The second essential item for a papernone/paperless office is a way of managing scanned documents. While you could just use Windows Explorer or Mac Finder, there is an argument to be made for buying something special. The software I’ve found is Nuance PaperPort 11 Professional (US$199). It is for Windows only, which is not ideal, but I can probably live with that. I’ve looked for an equivalent for Mac OS X, but haven’t found anything good enough yet … any ideas?
Anyhow, with respect to PaperPort 11 Professional, here’s the process once connected to a scanner:
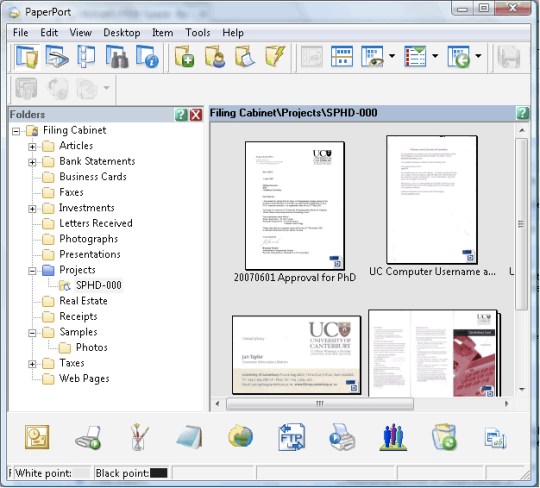
- Choose where you want the scanned document to go … PaperPort uses standard Windows file folder hierarchies and structures for storing scanned documents. It ships with a default set, but it is very easy to start a new one for your own custom needs, or even point it at your current “My Documents” (Windows 98/2000/XP) or “Documents” (Vista) hierarchy. In the image below, I’m currently in the “SPHD-000” sub-folder within the “Projects” folder. You can see four documents that I’ve scanned related to the administration side of doing my PhD. You will note that I am displaying each scanned document as a thumbnail preview; others options are just like what’s available in Windows Explorer … Large Icons, Small Icons, List or Details.
- Click the scan button in PaperPort, or on the Scanner … The second button in along the top of PaperPort is the scan button (actually, having used Office 2007 for a few weeks, this application would really benefit from a re-doing over with the Ribbon interface style). Once clicked, it opens a scanning preview pane, whereby you select the type of document you are scanning (eg, black-and-white document, color document, color photograph, and more). Once clicked it displays the scanning preferences for that profile, and then you click “Scan” and the process starts.
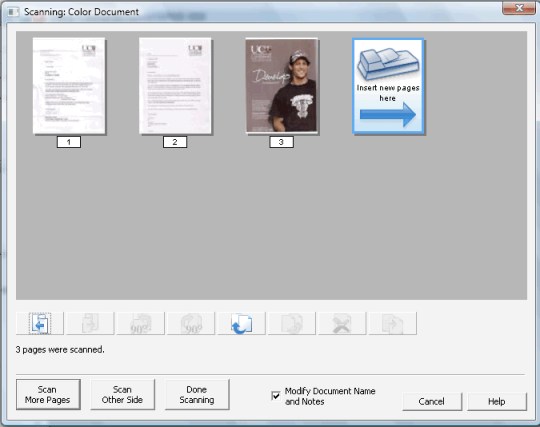
- Assemble the scanned document … PaperPort is totally cool in that it gives you the ability to ‘create’ a final scanned document made up of multiple scans. So … for example … let’s say that I’ve got a three page invoice from a utilities provider, and in addition there are some handwritten notes on a sheet of paper from a call I made to them regarding the invoice, and also an email back from them as a result of the call. I can scan the invoice, and then add my handwritten notes, and then add the email … so that I have a “compound” final document made up of multiple individual items related to a single thing. Within the scanning window I can shift the thumbnails around (so that, for example, my handwritten notes appear before the invoice). When I’m done adding documents to the document I’m assembling, I click “Done Scanning”. In the picture below,
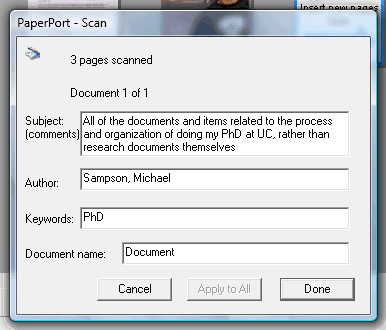
I have two different letters and a graphic image from my University. - Enter descriptive data about the document, eg, meta-data … Once the assembled document is finalized and I’ve clicked “Done Scanning”, I then get prompted for descriptive data about the document. I can enter a subject, an author, keywords, and a title / file name for the document. Another neat feature in PaperPort is that when you set up your file folders, you can assign default meta-data (subject, author and keywords) to the file folder itself, which are automagically applied to each document going into the folder. This is a great way of cutting down on the general meta-data entry required, allowing the user to only enter unique and special identifying information. In the picture below, the information that shows in the pop-up dialogue were set for the folder itself, and now they are being used as default values to populate the respective fields in this entry. Of course I can change them, or just leave them as is. Once the meta-data is good-to-go, click “Done” and the document is saved into the folder.
And you’re done! You have a digital document in a file folder that you can carry with you on a laptop, or … if you want it across multiple machines, you can synchronize the file folders using one of many synchronization software offerings. PaperPort also has a number of workgroup-oriented scanning options, such as being able to scan on one computer and put into a file into a file folder on another user’s computer.
There is a standard version for half the price of the Professional Edition, but looking through the feature comparison, there are at least three items in the Professional version that would make it highly desirable for me: the split desktop so you can browse two different document folders at once, the high compression alternative for color documents, and the support for automatic scheduled index updating. And for a single license, the price different is only US$100, so it is really a non-issue.
Are You Papernone or Paperless?
So, in summary, I’m impressed with possibilities … and will continue to think and investigate. I realize there’s a difference between having no paper (“papernone”) and having less paper (“paperless”).
How do you handle either in your work? What tools have worked for you? I’d love to hear your experiences.
Categories: Tools & Technologies
